PDF – Scanned
Locate Digital Originals if Possible
Make Your Own Good Quality Copy
When creating a scanned PDF file, the first step is to make sure that the scan is as clear and readable as possible. Without a good quality original, the result will still be inaccessible even if most of the text is recognizable.
- Remove any handwriting, underlining, etc.
- Check for lines that are cut off.
- Check for blurry text.
- All pages should be in the correct orientation for reading onscreen.
- Copies should be of only one page at a time.
- Check for partial pages or seams.
- Colored text can cause difficulties with color contrast and text recognition may be inaccurate.
Here is an example of a poor-quality photocopy from a book. Some of the words near the crease of the spine are cut off, and the text includes handwritten underlining and notes.
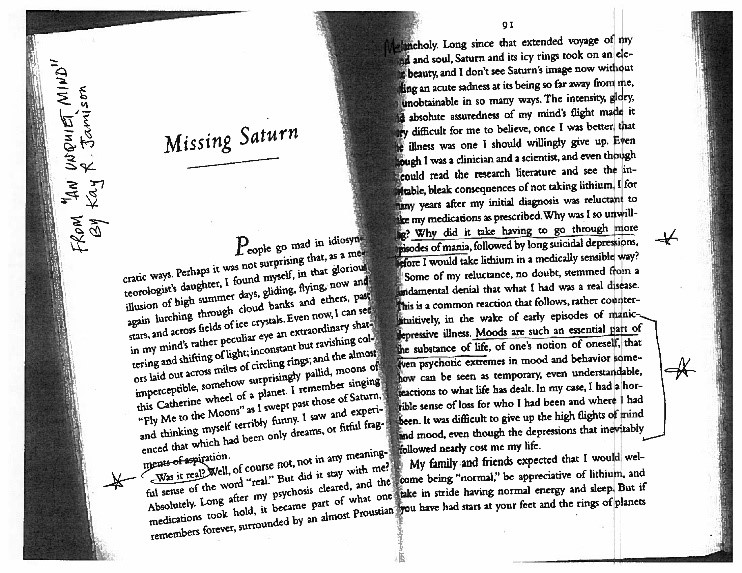
Assistive technology will have a difficult time interpreting this document, since it can’t guess at the missing words and the underlining could prevent it from recognizing the text accurately.
Good questions to ask yourself are:
- Can I read this easily?
- Do I have to guess at any of the words?
- Do I have to turn my head or rotate the document to read it?
- Is more than one page visible?
The following video shows the user experience when a PDF is not made from a clean copy.
Recognize Text with Anthology Ally in Canvas
Recognize Text with Adobe Cloud OCR Tool
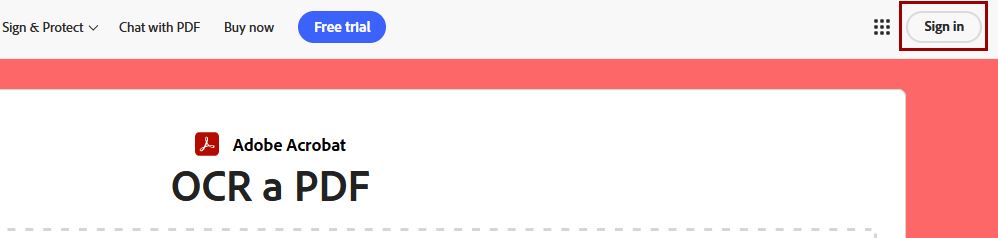
For employees without access to Canvas, Adobe has a free text recognition tool. In a web browser, sign in to Adobe Cloud. You can create a free account if necessary. The OCR tool is free to use.
Click the “Select a file” button to upload a scanned PDF.
You may be prompted to sign up for a free trial of an Adobe subscription. You can ignore this – a paid subscription is not necessary to use the OCR Tool.
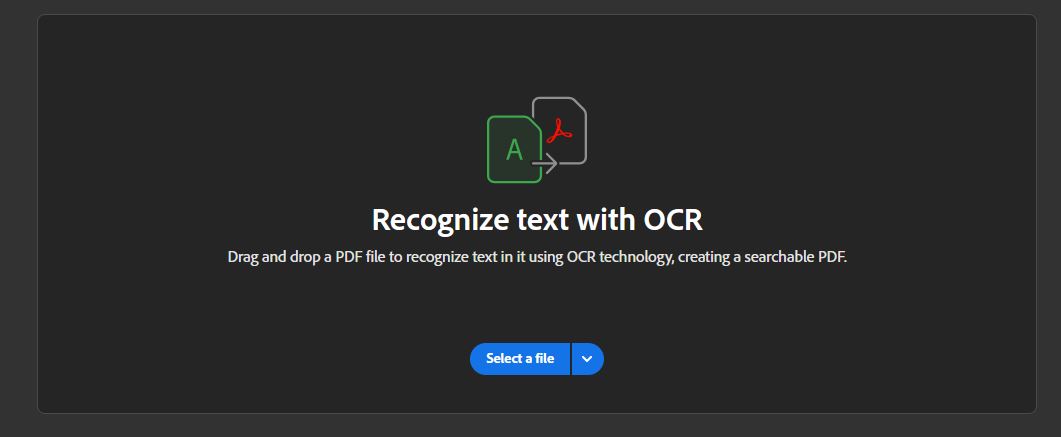
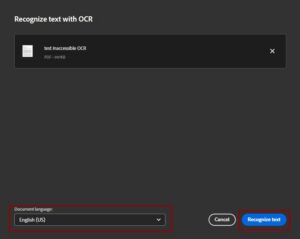
Once the file is uploaded, select the document language, then choose the button to “Recognize text.”
The document will display in the browser window. Check that you can select text in the document. Then click the download button in the top menu.

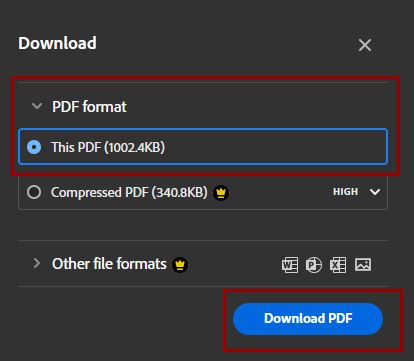
Keep the default choices to download “this PDF” and select “Download PDF.”
Recognize Text with Adobe Acrobat Professional DC
Contact your IT department to request Adobe Acrobat Professional. Licensing may already exist.
Video Tutorial
Written Tutorial
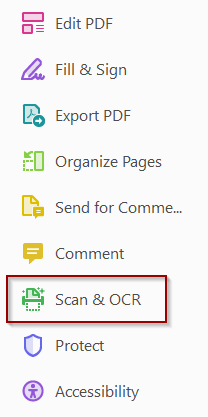
Open the Scan & OCR tool in the toolbar (formerly the Enhance Scans tool).
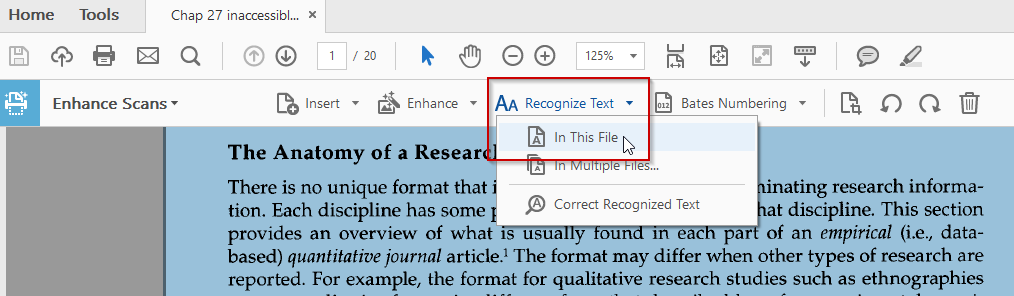
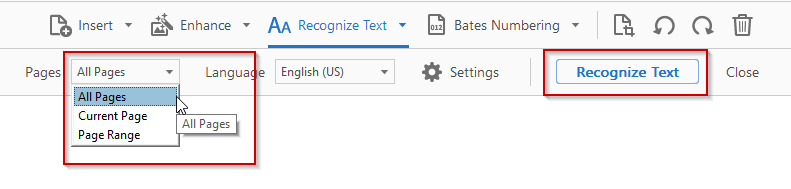
In the toolbar that opens at the top of the page, select Recognize Text, then In This File.
Choose from the All Pages drop-down menu to do either All Pages or a range of pages (it is better not to do longer documents all at once), then click the Recognize Text button. Once the tool finishes running, you should be able to highlight text in the document. Save the document before closing.
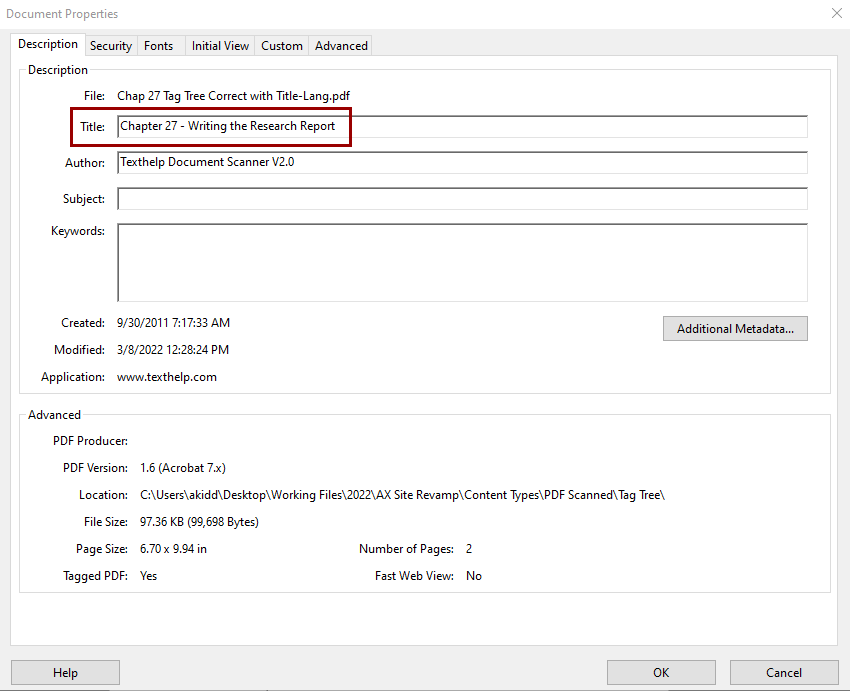
Set the Document Title
To set the Document Title, open File, Properties. On the Description tab, type a descriptive document title in the Title field.
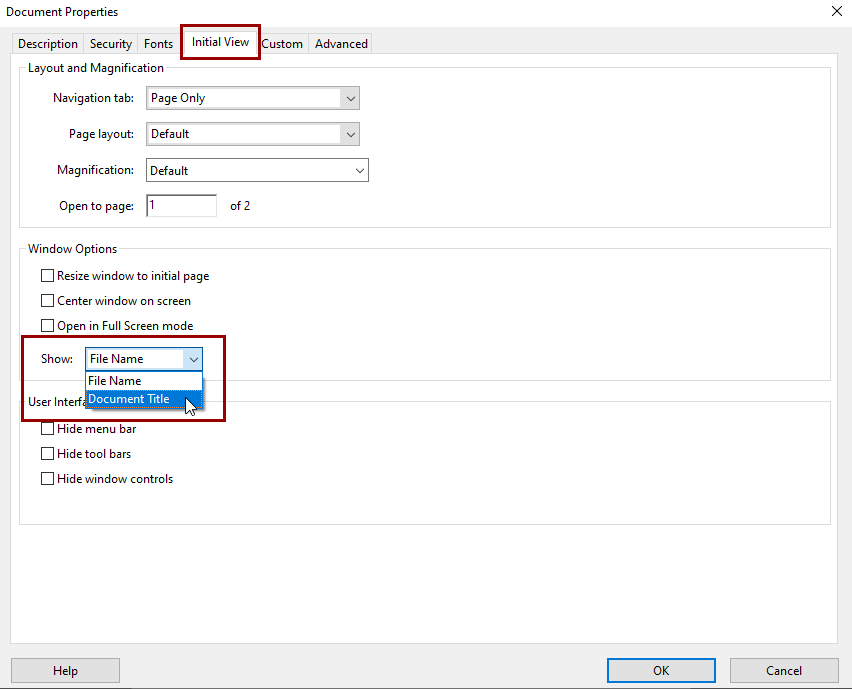
Next, set the document title to display instead of the file name when the document is open.
- Switch to the Initial View tab in the Properties window.
- Look for the Show drop-down menu under Window Options.
- Change the selection from File Name to Document Title.
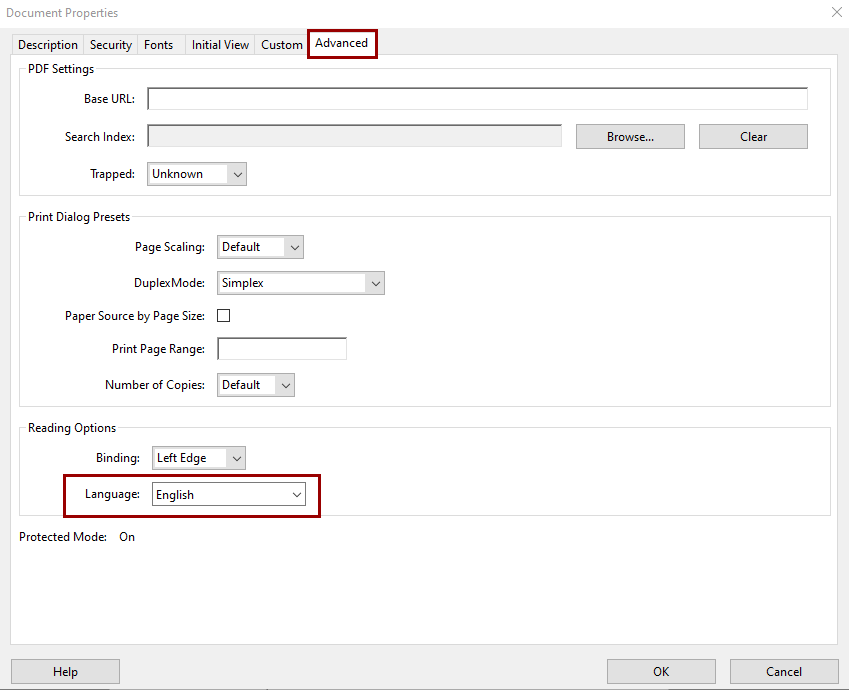
Set the Document Language
To set the primary language of the document, open File, Properties. On the Advanced tab, find the Language drop-down menu under Reading Options. Set the language to the primary language of the document.
Add Tags
Tags are how Adobe designates document structure in a PDF. They provide an additional layer of code to the PDF that can be accessed by assistive technology.
Tags indicate reading order as well as headings and alternative text and must be added to a scanned PDF.
To add tags in Acrobat DC, open the Accessibility Toolbar, and click on Autotag Document.

Table Header Row
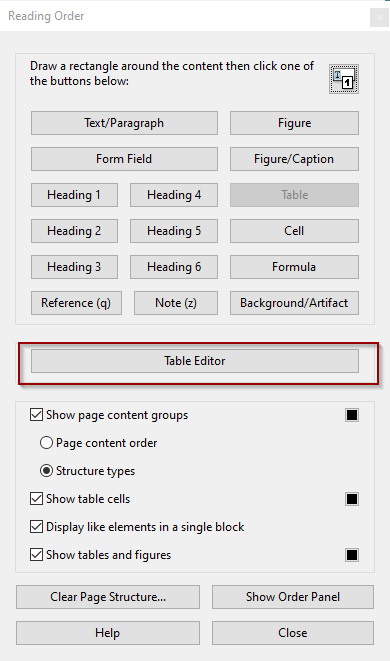
In order to add a table header row to a table in Acrobat DC, select the table and click on Table Editor in the Reading Order window.
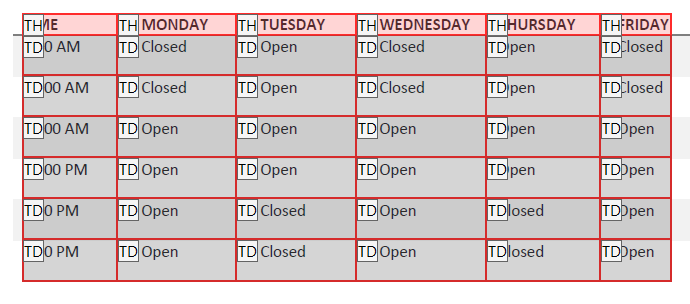
The table cells will be outlined in red and each cell will have a tag, either TH (table header) or TD (table data). The top row should be marked with TH and remaining cells should usually be TD.
This example shows what a table should look like in the table editor:
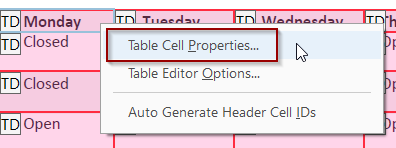
To make the top row to a header row, each cell must be changed individually. Right click on a cell and select Table Cell Properties.
Change the Type from Data Cell to Header Cell and set the Scope to Column. Repeat with the each of the top row cells.
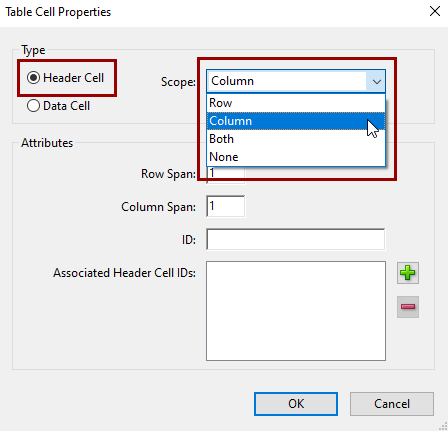
If the first column is a header column, set the Type to Header Cell, but the Scope to Row.
Alternative Text
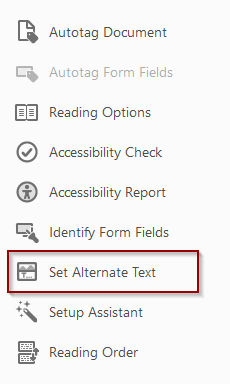
If images are present in the scanned PDF, you’ll also need to add alternative text. Use the Accessibility Tool to find and correct all images in the document at once.
Choose the Set Alternate Text option in the Accessibility Toolbar.
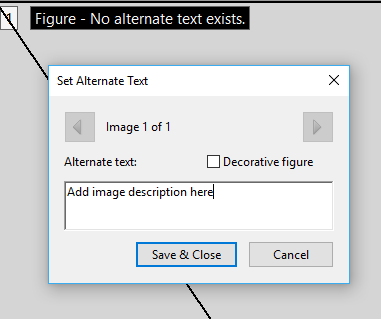
Add a description in the text field, then use the arrow key to jump to the next image in the document. Choose Save & Close when finished.
Reading Order Panel - Page Content Order
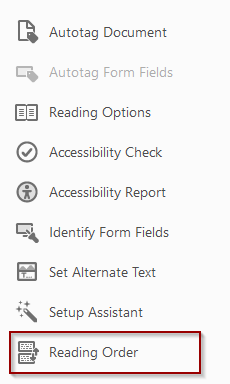
To check the accuracy of autotags, open the Reading Order Panel. On the Accessibility Toolbar, select Reading Order.
Select Show Order Panel on the Reading Order window:
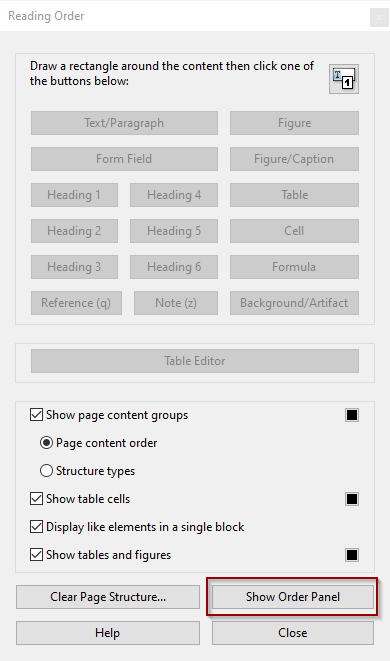
This opens a panel on the left side of the document. The numbers in the panel correspond to the numbers highlighted on the page. These numbers are the visual representation of the tags.
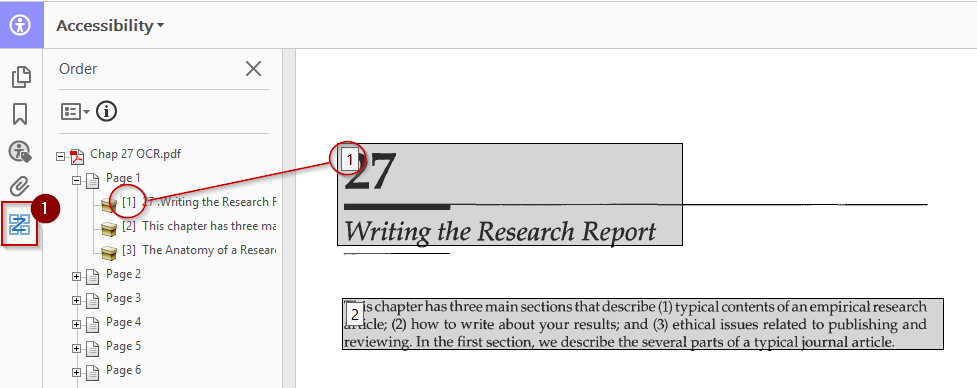
If the numbers are not in a logical order, drag the tag into the correct position in the panel.
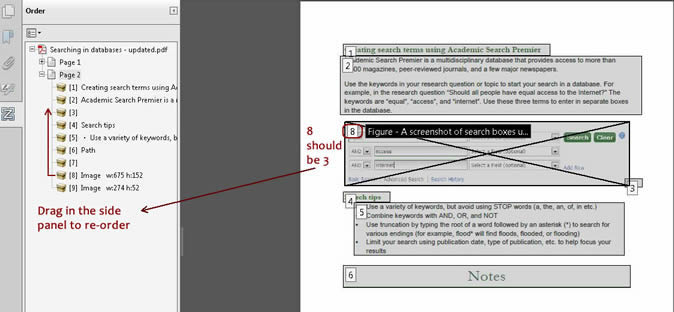
Note: Acrobat has a bug when dragging tags that sometimes causes them to disappear. There is no “undo” when editing tags. Save often so you can recover easily if something goes wrong.
Reading Order Panel - Structure Types
As with any other document type, it’s important to include headings in a PDF. The Reading Order tool allows you to check for document structure.
On the Reading Order window, change the radio button from Page content order to Structure types.
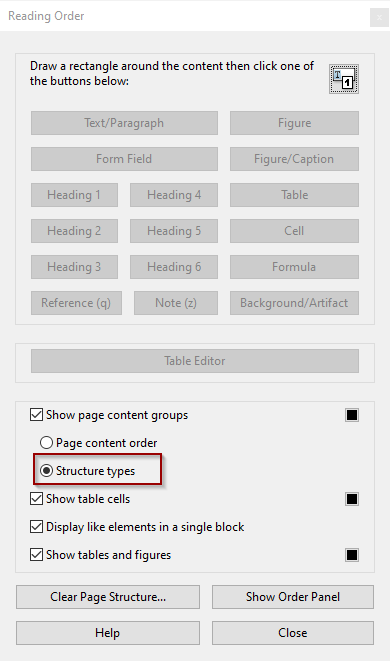
You’ll see that the numbers on the page that showed reading order have changed to structure tags such as P for Text/Paragraph and H1 for Heading 1.
This example has tags, but they are all set to P, leaving the document without a heading structure:
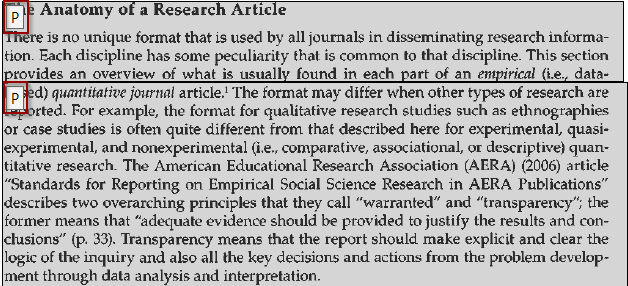
To set the headings, select the area that needs a different tag. There are two ways to do this.
- Select an existing tag, if it only includes the relevant text. This will select the entire shaded area that belongs to the tag.
- Use the cursor to draw a box around the text. This may be needed if text is grouped together. The selected text will have pink boxes drawn around it so you can be sure which text will be tagged.
In each case, once selected, use the heading buttons on the Reading Order tool to set the appropriate heading level.
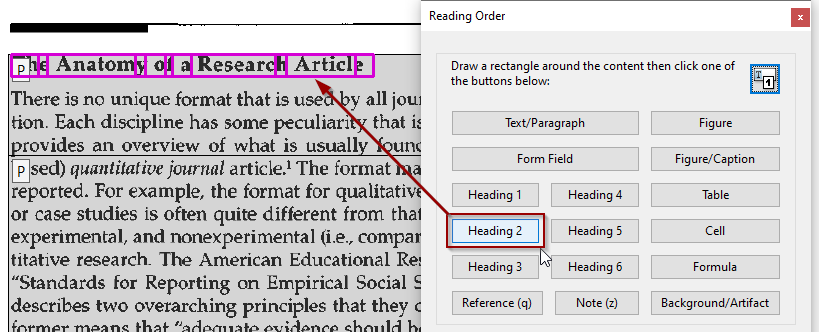
The tag will visually change in the document from P to H2, and the shaded area will break into sections.

Tag Tree - Reading Order
The final (but most important) place to check the tags is in the Tag Tree. Using the Reading Order Panel first is important so that when you get to the Tag Tree, most of the structure should already be correct. There can be lingering issues with tags, however, and the Tag Tree is where you can manually fix those.
Navigating the Tags Pane
In the View menu, select Show/Hide, Navigation Panes, Tags.
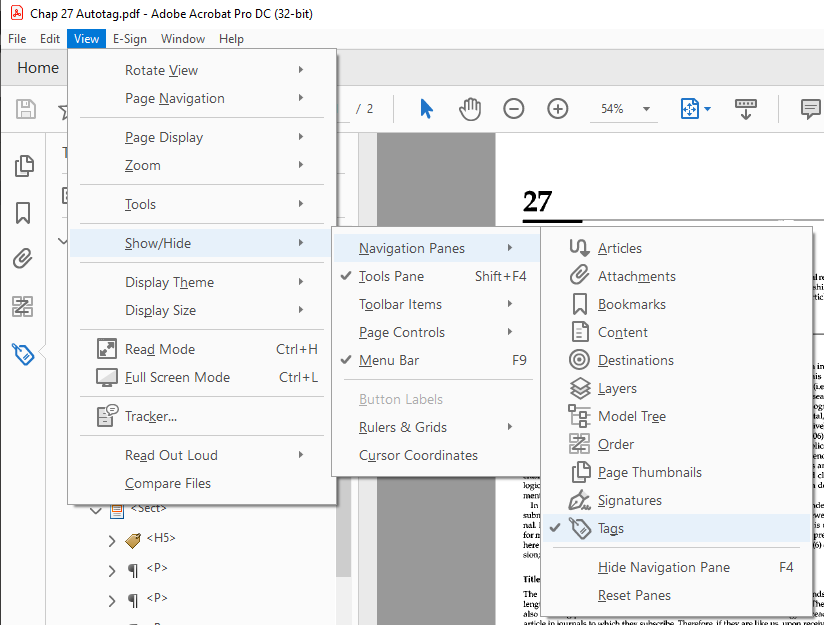
This opens a new panel on the left side of the document. The tags look like HTML. For example, <H1> is Heading 1, and <P> is paragraph text.

Content is nested inside the tags. If you expand a tag, it will outline the corresponding content on the page in pink, including nested content.
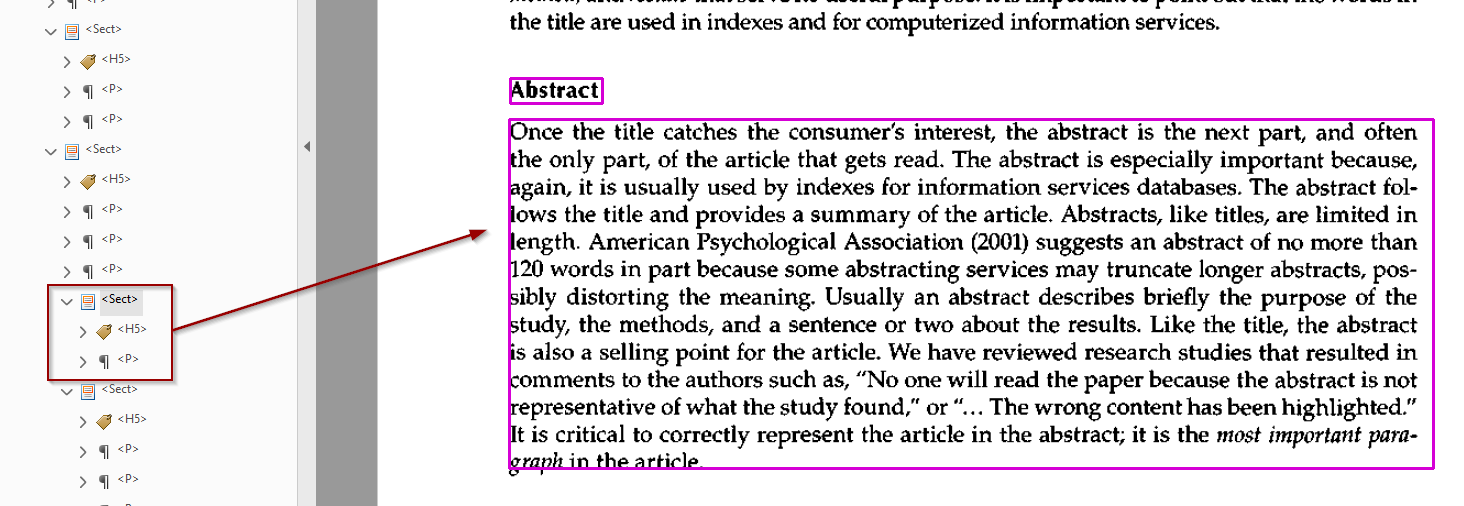
Correcting the Reading Order
- Begin by clicking down the tag tree to see if the order corresponds with the visual order on the page. You can drag tags into the correct order in the Tags pane.
In this example, the paragraph describing the chapter is at the bottom of the tags. It should be directly underneath the chapter title.
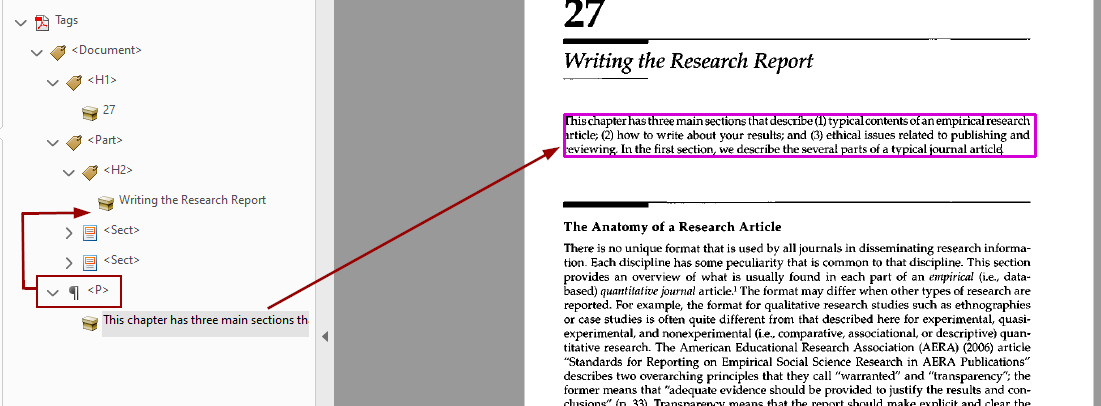
- A line appears as you drag it to indicate where it will move to when you stop dragging. Be careful not to accidentally nest one tag inside another.

- If tags are nested that shouldn’t be, drag them out into the higher level. For example, here we have two sections nested inside another section. They all should be at the same level within the tree.

Tag Tree - Page Structure
Sometimes it takes significant manual editing to correct the document structure. These are some of the problems you should look for.
Document Tag
All of the tags in a PDF should be within an overall Document tag. Currently, this is not created by default and must be added manually.
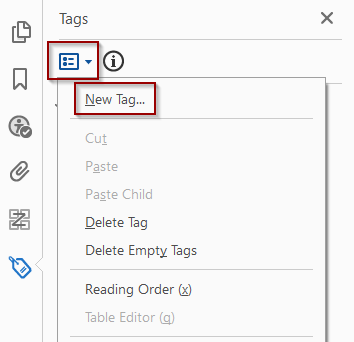
Click on the Tag Options drop-down menu and select New Tag.
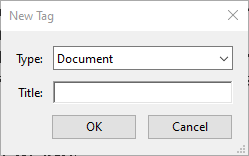
Select Document as the tag type.
Drag all of the other tags so they’re nested inside the Document tag. Select all of the tags at once so you can drag them into the Document tag in one step. This will maintain the reading order.
Incorrect Tag Labels
Tags may be labeled incorrectly, as in this example of a heading that’s labeled as paragraph text.

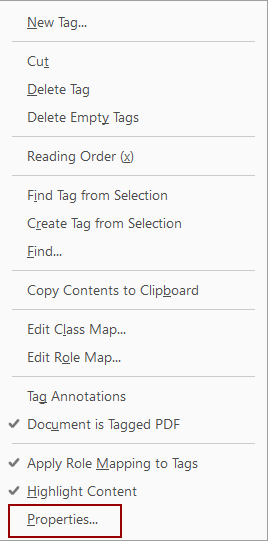
- Right-click on the tag and select Properties.
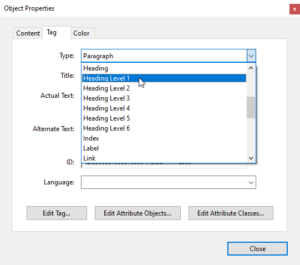
- Use the Type drop-down menu to select the appropriate heading level.
Untagged Content
All content should be tagged. If you find content that is skipped as you go down the tag tree, first see if there’s a tag associated with it that’s simply out of order.
- Select the content in the document. Click on the Tag Options drop-down menu and select Find Tag From Selection.
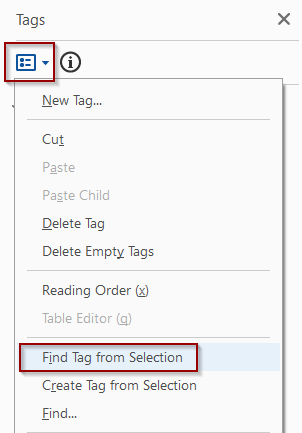
- If a tag already exists, drag it into the correct order in the tags pane.
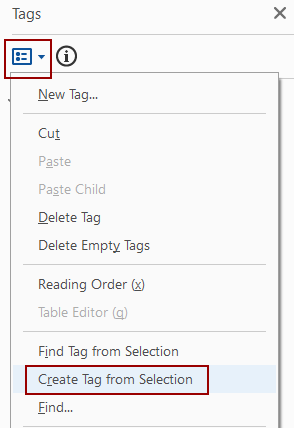
- If no tag is found, create a new tag. Select the content in the document and then click Tag Options, Create Tag from Selection. Once the tag is created, drag it into the correct order in the tag pane and make sure it’s labeled correctly.
Empty Tags
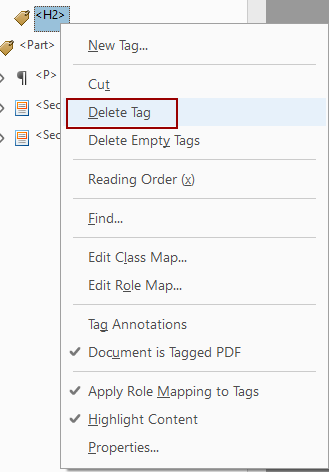
A tag is empty if there’s no way to expand it because nothing is nested inside it. Empty tags create confusion and they need to either be filled or deleted.
- Check first to see if the content that should be in the tag is in another tag. If so, move the content into the empty tag.
- Once you’re sure the tag is not needed, right-click on it and select Delete Tag.
Images - Long Description
Accessibility Check
Adobe Acrobat Accessibility Checker (Universal Design Only)
On the Accessibility Toolbar, select Accessibility Check.

Click Start Checking on the options window.
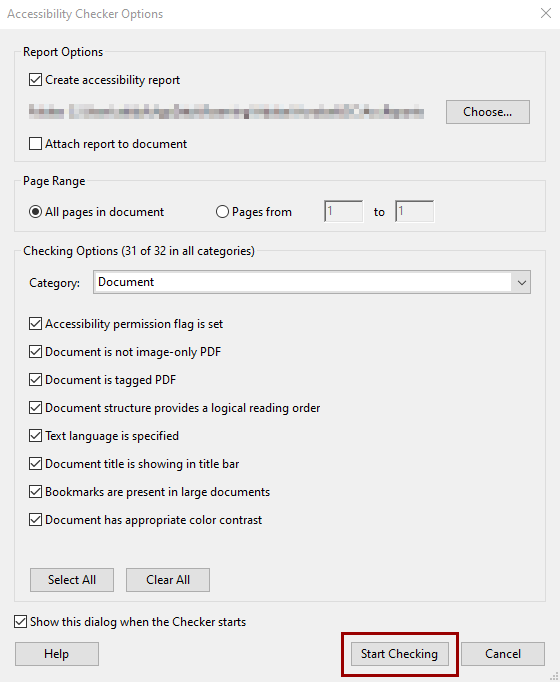
The summary will be displayed in the pane on the left side of the document. Expand the items for details.
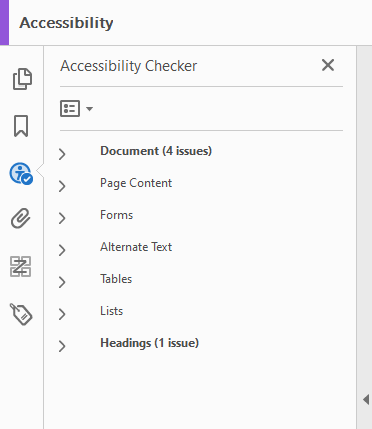
Right-click on an item in the report. If Fix is an option, you can choose it and you will be prompted with a quick method of fixing the item.
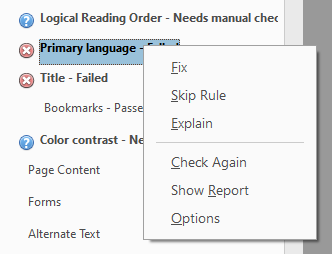
Other items need to be fixed manually within the document. Click on the item to be taken to the point in the document where the issue takes place.
PAC 2024 (Full Accessibility)
PAC 2024 scans PDFs for compliance with WCAG 2.1 standards. You still need Acrobat Professional to be able to fix any issues found.
This is for more advanced users who are responsible for full accessibility.
- Download PAC 2024 from the PDF/UA Foundation. Unfortunately, this is currently a Windows-only program.
- Extract the contents from the downloaded zip file, then run the PAC.exe program from the extracted folder. No installation is necessary.
- The screenshots in this tutorial show an older version of PAC, but very little has changed in the user’s experience.
- Use the button with the arrow icon to browse for a PDF file, or drag the file onto the window.
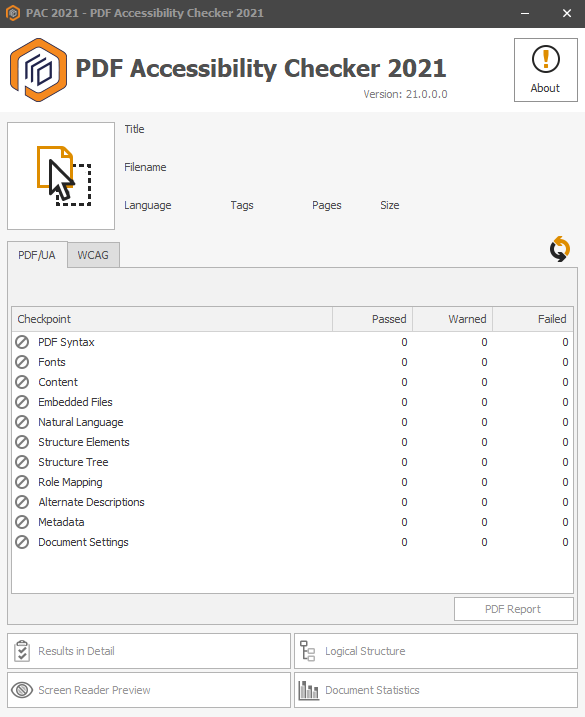
- Click on the WCAG tab to view an overview of the results.

- Click on Results in Detail for a breakdown of all the issues.
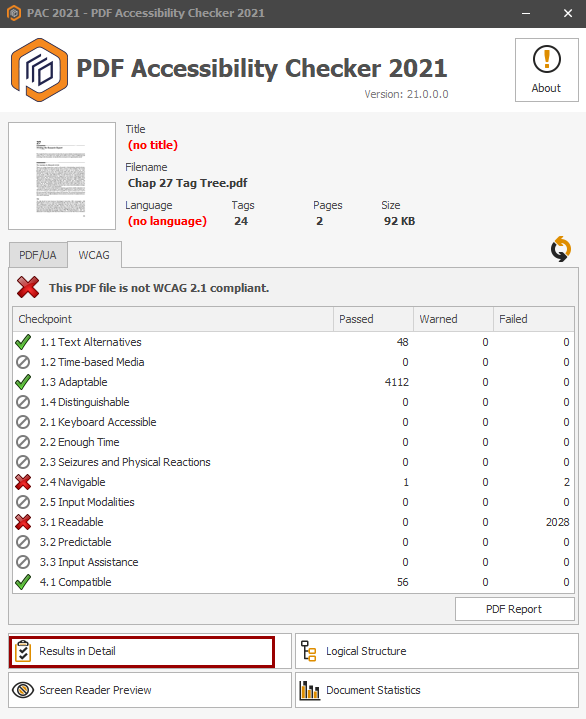
- The detailed results show the PDF/UA results by default. Expand the WCAG report instead and drill down until you reach the specific item descriptions. You’ll see a snapshot of the location in the document where the issue takes place. This helps you to know where to fix the item.
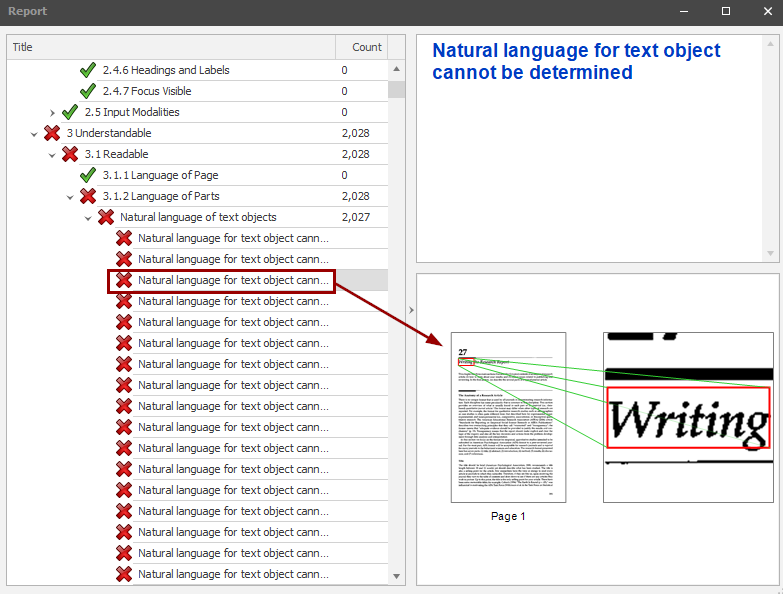
- In the case of the example in the following screenshot, simply setting the document language will resolve 2027 “Natural language of text object cannot be determined” errors.